How to Enroll in Courses at McMaster University: Part 1
An Introduction to McMaster’s My Timetable Tool
Now that you know what courses you need to graduate with a double degree, it is time to start planning out your next semester. Over the next 2 blog posts, I will introduce 2 different ways for you to plan your timetable so that it fits your needs. In this first short blog post, I will introduce the McMaster My Timetable tool that will automatically generate timetables for you to choose from given a list of courses. Let’s begin by watching a brief overview video of the My Timetable tool created by McMaster University:
An overview of the McMaster My Timetable tool: https://youtu.be/MvZ0kqb00-8.
Note that I am not an academic advisor, nor do I hold/have held any positions at McMaster that would qualify me to provide professional academic advice on behalf of the university. I am simply a recent grad who is creating a blog so that those who come after me can have a resource that I wish I had going through the double degree process. Always speak to an academic advisor from the university when you have any doubts about your academic progression.
Who Should Use the My Timetable Tool?
The McMaster My Timetable tool is a convenient tool for most students to quickly create their optimal timetable. It is designed so that most students can quickly select the courses they want to take (and this should be easy since you already have your master timetable) and it will generate different timetables that are possible given your course selections. It will also tell you when there are no possible timetables given your course selection (in which case, you may want to read part 2 on how to create your timetable manually).
In general, everyone should start off by using the McMaster My Timetable tool, although the following groups of students may find that they will also need to do some manual tweaking:
- Students that are planning to overload their semester.
- Students planning on taking courses that they do not have prerequisites for.
- Students planning on taking two courses with conflicting times.
- Students with other arrangements agreed upon with their academic advisors.
I will now present a list of steps you need to follow to enroll in courses using the McMaster My Timetable tool.
1. Generate Your Desired Timetable Using the My Timetable Tool
To generate your timetable, open the My Timetable tool in Mosaic, and navigate to the My Timetable tool. Then, in the search bar, enter the courses that you would like to take. You should see the timetable automatically populate with courses that you want to take. See the video below by McMaster University to learn how to use the My Timetable tool:
A tutorial for the McMaster My Timetable tool: https://youtu.be/wRjSN2P3liw.
Once you have entered all of the courses you want to take, use the arrows at the top of the timetable to scroll through different timetables that can be generated with the courses you selected. If possible, find one or more schedules that interest you and save them for your enrollment date.
Otherwise, if no possible timetables exist, remove courses from your timetable until a possible timetable can be generated. I recommend removing courses in the following order to ensure that you can graduate with at least 1 degree on time:
- Any elective courses for your second degree.
- Any required courses for your second degree.
- Any elective courses for your first degree.
You should never have to remove a required course from your first degree (assuming there are no other substitute courses available). If you find yourself in such a position, you should speak to an academic advisor to get the issue resolved.
After removing such courses, add new courses into your timetable using the ranked list you created when making your master plan. You may find that you need to expand your ranked list, if none of your desired courses fit your timetable.
Repeat until you have a viable timetable for enrollment and save your timetable. Remember you can always speak to an academic advisor if you have any difficulties creating your timetable.
2. Determine Your Enrollment Date
At McMaster, students of different levels start enrollment at different times. In general, fifth years have an earlier enrollment date than fourth years, which have an earlier enrollment date than third years, and so on. After you’ve created your timetable, you will need to determine when you can enroll in your courses.
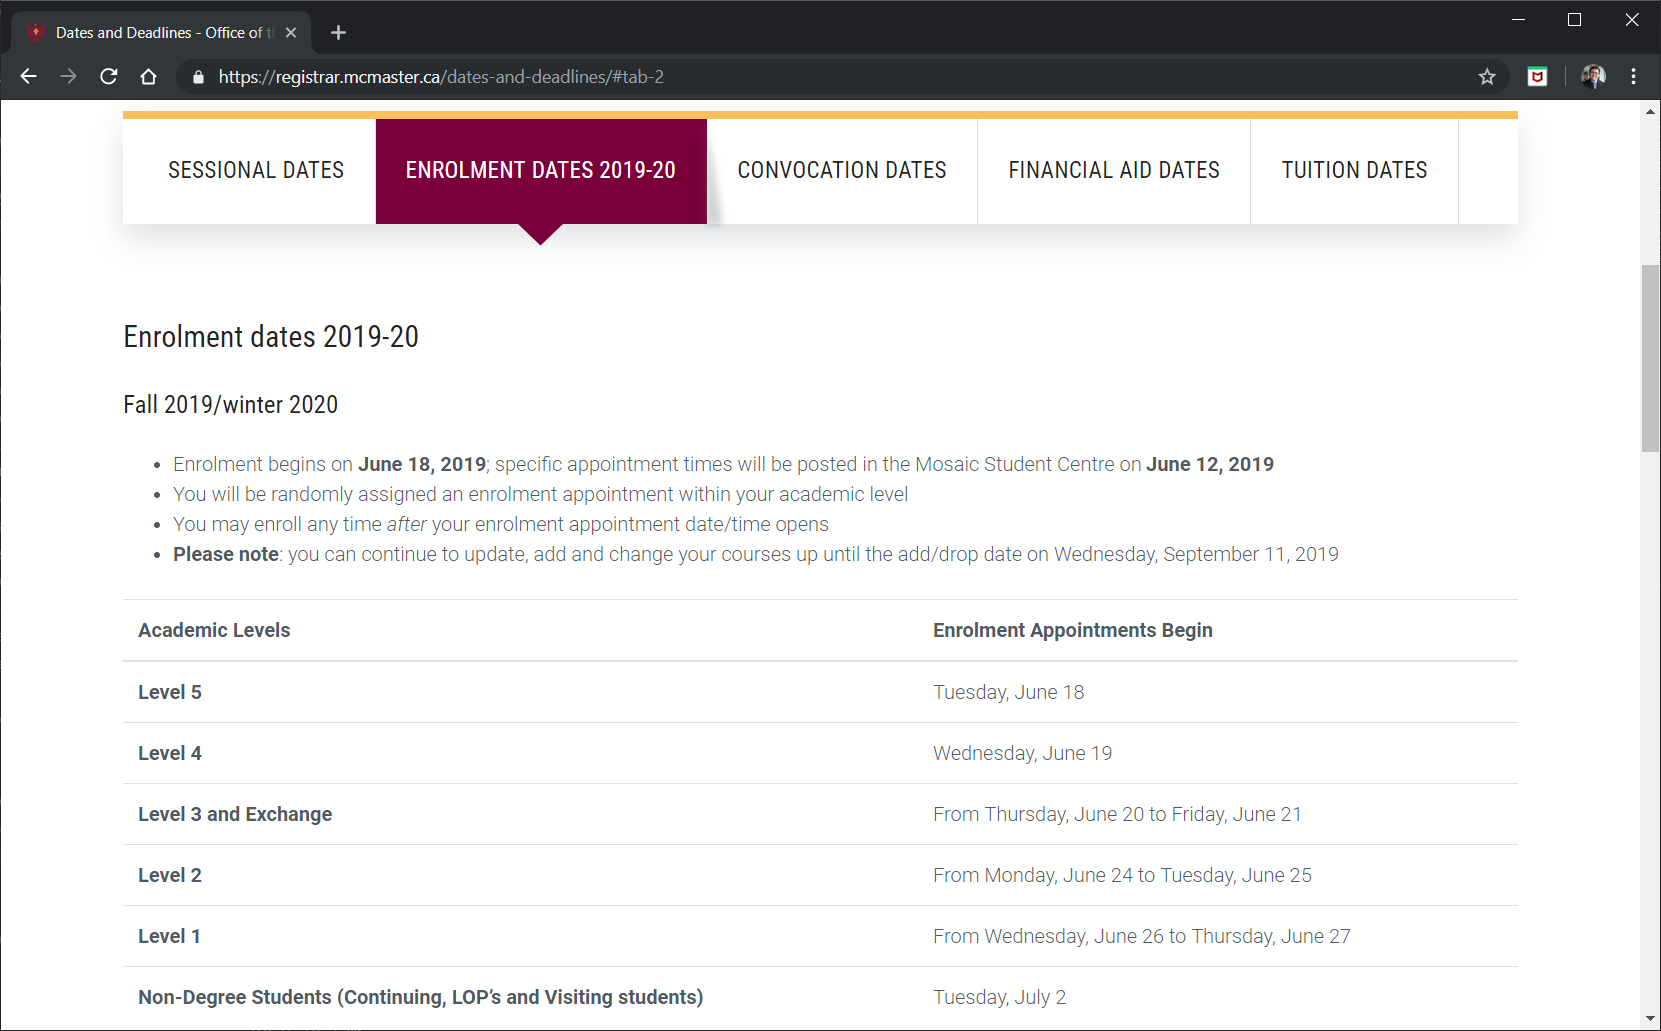
Enrollment Dates for the 2019-2020 Academic Year: https://registrar.mcmaster.ca/dates-and-deadlines/#tab-2.
Start by determining the day by going to the Registrar’s website at https://registrar.mcmaster.ca/dates-and-deadlines/#tab-2. Under “Enrollment Dates 2019-20”, there is a table that lists the enrollment dates for your level.
Once you’ve determined your enrollment date, you will need to determine the enrollment time. The enrollment time is the exact time-of-day where you can start enrolling in courses. In my own experience, your exact enrollment time is released after the dates are announced, which is why I recommend checking the enrollment dates on the Registrar’s website before checking your exact time.
To determine the enrollment time, you will need to log into Mosaic, and go to the “Student Center”. On the right-hand side of the screen, there are multiple tabs. Click on “Open Enrollment Dates” on the right-hand side and select the appropriate term to view your enrollment time. If it is not available, then check again later.
3. Enroll in Courses
Enroll in your courses during your enrollment date and time. The McMaster My Timetable tool makes this really easy. The following McMaster video will show you how to use the My Timetable tool to enroll in courses using the My Timetable tool.
How to enroll in courses using the My Timetable tool: https://youtu.be/fX9j6bPBVC4.
When your enrollment time comes, I recommend enrolling in courses as soon as possible because your desired courses or times may fill up later on. If your desired courses are full, then you may need to create a new timetable with alternative timings or courses. To do this, you can go back to step 1, and try again.
Another issue that I’ve encountered is that courses that have low enrollment may be cancelled. If this happens to you, you will also need to go back to step 1 to try again.
Keep in mind that you should always get a spot in required courses for your first degree when no substitute course is available, even if it is not at a time you desire. If this is not the case, then you should speak with your academic advisor to get the issue resolved.
4. Go to Class
Once you’ve enrolled in your courses, once school starts, you are ready to go to class. Remember to go to class because important information is delivered to students during class. You will learn what the professor expects of you, and it will help you excel in your studies. Try not to be late and learn as much as you can from your professors, teaching assistants, and your peers. Have fun and enjoy your studies.

Source: Unsplash.
And that is a wrap for this blog post. If you have reached this far, you should have enrolled in your classes, and you should be ready for school once it starts. In my next post, I will describe how to manually create a timetable for students with more advanced planning needs, such as overloading, taking classes with missing prerequisites, or taking conflicting classes.
DISCLAIMER: All opinions expressed in this blog post are my own and do not necessarily reflect that of any company or organization that I am affiliated with. I am not an academic advisor, nor do I hold/have held any position at McMaster that would qualify me to provide academic advice to current McMaster students. This post is a reflection of my own personal experience, and your mileage following my advice may vary depending on personal circumstances. Follow my advice at your own risk. I assume no responsibility for any loss or damages incurred as a result of this blog post.